|
 |
|
| |
|
Set Focus on a Text Box when
web page first loads |
|
| 0. |
|
Overview:
As you already should know, you can set the the
template parameters to be different for each
one of your pages so that each page has it's
own
unique highlighted menu item and/or background
colors.
Accordingly, by using another new template
parameter,
you
can
do the same for adding a JavaScript function
(or inline code) to set the focus to be different
(or the same) for each one your web pages.
This is a little tricky so just follow the steps
below and if you have any questions or problem,
please do contact customer support. |
|
| |
|
|
|
| |
|
|
|
| 1. |
|
Add a another template parameter in the SUPER template. I would call it the
onLoadEventAddendum parameter.
For
example, in the SUPER template of your web site:
put this code in RED, after to your other
template parameters:
<!--
TemplateParam name="TNavParam" type="text" value="" -->
<!-- TemplateParam name="SNavParam" type="text" value="" -->
<!-- TemplateParam name="bgcolor" type="text" value="#FFFFFF" -->
...
...
...
<!--
TemplateParam name="onLoadEventAddendum" type="text" value="" -->
|
|
| |
|
|
|
| |
|
|
|
| 2. |
|
In the same SUPER template, add the following inside the BODY tag:
onLoad="@@(onLoadEventAddendum)@@ void(0);"
so that a
typical "completed" BODY tag up top will look like this below:
<body
leftmargin="0" topmargin="0" rightmargin="0" bottommargin="0" marginwidth="0" marginheight="0" style="margin-bottom: 0px; margin-left: 0px; margin-right: 0px; margin-top: 0px;" onLoad="@@(onLoadEventAddendum)@@ void(0);" >
|
|
| |
|
|
|
| |
|
|
|
| 3. |
|
Next, execute the command:
Modify --> Templates --> Update Pages...
to have the
new template parameter,
onLoadEventAddendum and the changes to the body
tag applied to all the other pages of your web site
.
|
|
| |
|
|
|
| |
|
|
|
| 4 |
|
IMPORTANT
You will have to set the checkbox "passthrough"
parameter for the templates, TOPNAV, and it's
child templates on down to the web pages
so that this new template parameter, onLoadEventAddendum, will
be available for the web pages.
Dreamweaver will
also ask you
to Update Pages on
each change after you save it. Say
OK to update these pages.
|
|
| |
|
|
|
| 5. |
|
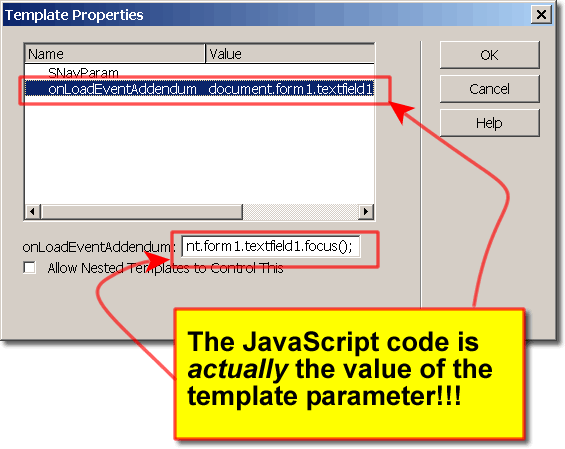
In the web page, e.g. for example Forms_01.htm, you want to have the JavaScript
command for say the focus() event,
you just add the code in the template parameter
on that web page.
For example, if you want the textbox with ID textfield1
to be focus when loading, you can use the folowing
JavaScript code:
document.form1.textfield1.focus();
You can also see the below image since it can
be confusing on where it should go.
 |
|
| |
|
|
|
| |
|
|
|
| |
|
|
|
| 6. |
|
By doing it this way, you can still update pages the same way and Dreamweaver
will not touch your client side code
And just as important, each one your web pages can have a different focus, or
JavaScript command if you want it to be. |
|
| |
|
|
|
| |
|
|
|
| |
|
ADDITIONALLY
If you wanted to call a function instead of some
inline JavaScript code like above, please use
the name of the function instead of what you
see
above,
e.g.
So instead of putting the code,
document.form1.textfield1.focus();
You can put a call to your JavaScript function.
Like for example:
selectCursorStartingPoint();
NOTE: Put a
semi-colon ";" at the end of your function call.
Then, inside the Editable region, named doctitle,
of that same web page that needs to have the textbox
focused
when the page loads, you put your <script></script> tags and inside of these script tags, you can define (or put the code) for
your JavaScript .function.
In fact, inside the Editable Region doctitle, you
can put additional CSS style blocks, other JavaScript
<SCRIPT> tags, additional meta tags, and any other
stuff that you want customize for that page.
It's a little tricky, but it's not bad once
you do one of them.
|
|
| |
|
|
|
| |
|
|
|
| |
|
|
|
| |
|
|
|
|